Introduction
svtsim is a web-based cardiac electrophysiology study (EPS) simulator, which is primarily designed for training and education. Its target audience includes cardiology and clinical cardiac electrophysiology fellows-in-training and electrophysiology laboratory nurses and technicians. It provides an environment to simulate different cardiac arrhythmias and it allows the user to perform various diagnostic maneuvers by pacing the simulated heart in realtime.
After svtsim launches successfully, you should see a screen like the following figure.
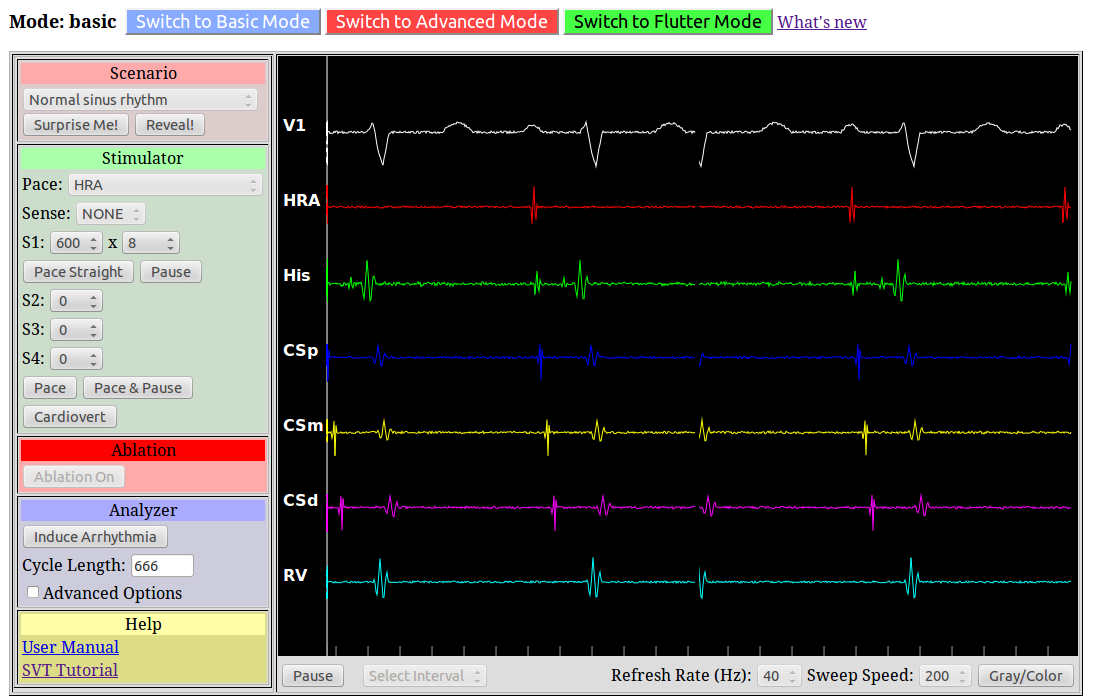
The svtsim screen is composed of multiple sections, which are explained in the rest of this document.
Main Canvas
The canvas is the part of the screen where the simulated signals are shown. On the left side of the canvas, the label of the channels are represented. On the right, simulated surface electrocardiogram and intracardiac electrograms are drawn. In the basic mode and from top to bottom, the simulated signals correspond to the surface lead V1 and intracardiac electrograms mimicking signals recorded by a catheter located at high right atrium (HRA), His bundle (HIS), proximal coronary sinus (CSp), middle coronary sinus (CSm), distal coronary sinus (CSd), and right ventricular apex (RV). In the flutter mode, the right atrial channel is divided into three separate channels (RA1, RA2, and RA3). In both the advanced and flutter modes, an ablation channel is are shown if the scenario supports ablation.
The screen controls are located underneath the canvas:
At any time, you can pause the sweeping signals by pressing Pause. While in the pause mode, this button changes to Resume, as pressing it resumes the sweeping. Whenever pause is pushed, the screen is re-arrange such that the last time point is positioned at the right edge of the screen. You can also choose the Sweep Speed and the Refresh Rate from the corresponding dropboxes in the bottom of the screen. By default, the refresh rate is set at 40 Hz (i.e. screen is refreshed every 25 ms), which provides a very smooth sweep; however, you may need to reduce the refresh rate in slow computers (e.g. a refresh rate of 5 or 10 Hz is needed if viewing svtsim in older iPads). You can also toggle the color scheme from colored to gray scale by pushing Gray/Color button.
A caliper is active during the pause mode, which allows measurement of time intervals in millisecond. You can activate the caliper by holding the left mouse button and dragging the mouse pointer over the signal screen. Also in the pause mode, the Select Interval dropbox is active and let the user selects one of the following intervals, RR, PP, PR, AH, HV, and VA, which are then shown using the caliper.
Selection Bar
The (mode) selection bar is located on top of the page:

You can select the active mode using the selection bar. A mode is a collection of multiple scenarios (specific arrhythmias), which are grouped together. Currently, three modes are supported. svtsim starts in the Basic mode, which is composed of common bradycardias and tachycardias and is of general interest to anyone working in the cardiology or electrophysiology fields. The Advanced mode represents complex tachyarrhythmias with focus on different supraventricular tachycardias. The Flutter mode is a collection of typical and atypical flutters.
Control Panels
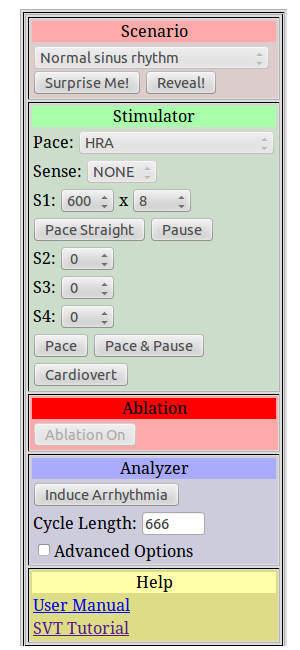
The user interacts with the simulated arrhythmia mainly through the control panels located on the left side of the canvas. It is divided into five panels: Scenario, Stimulator, Ablation, Analyzer, and Help.
Scenario: Choosing a scenario determines the underlying simulated arrhythmia. In some cases, such as atrial tachycardia and PJRT, tachycardia occurs spontaneously as soon as a scenario is chosen. However, in most cases, appropriate pacing maneuvers or clicking the Induce Arrhythmia button are needed to induce the arrhythmia. Pressing the Surprise Me! button randomly selects one of the available scenarios. Pressing the Reveal! button reveals what the selected scenario is. If Randomize the scenario is checked, the basic scenario is modified to produce a new scenario with the same underlying arrhythmia, but with a different (randomly selected) tachycardia cycle length.
Stimulator: This panel provides a simple stimulator, which allows the user to induce arrhythmia and perform diagnostic maneuvers. The user can select where to pace (using the Pace dropbox), where to sense (using the Sense dropbox), and the pacing protocol. The available Pace locations are HRA, RV apex, RV base, and high- and low-output Para-Hisian sites. In the basic mode, only HRA and RV apex are enabled. Possible Sense options are None (no sensing), HRA or RA. Note that only the first beat in a pacing train is synchronized to the sense channel.
If Pace Straight button is clicked, a pacing train with a cycle length equal to S1 is initiated and continues until explicitly stopped by clicking Stop Pacing. On the other hand, Pace button delivers a more complex protocol, composed of an initial pacing train (set by S1 interval and number of pulses in the train), followed by optional S2, S3 and S4 beats. S1 to S4 are entered in millisecond. After setting the protocol, the user initiates pacing by pressing either Pace or Pace & Pause buttons. The latter adds an automatic pause one second after the last beat in the pacing protocol. The Cardiovert button delivers simulated a DC shock to the scenario and terminates arrhythmias.
Ablation: This panel has only one member: Ablation On button. If the active scenario supports ablation, this button is active and turns on ablation. During ablation, the button changes into Ablation Off. It is assumed that the simulated ablation catheter is located at the correct site (e.g. slow pathway for AVNRT and cavotricuspid isthmus for typical flutter).
Analyzer: This panel complements the intracardiac signals by providing additional information about the arrhythmia model/scenario and assisting with arrhythmia induction. The Induce Arrhythmia works in both modes. It induces a reentrant arrhythmia (if possible for the given scenario). Realtime beat-to-beat ventricular cycle length (in millisecond) is calculated and presented in the Cycle Length box.
If the Advanced Options checkbox is selected, two extra buttons become available. The Analysis button calculates the nominal reentry cycle length for the active scenario and compares it to the minimum refractory period around the reentry circuit. Reentry is possibly only if the reentry cycle length is larger than the circuit refractory period. The user can use this information to optimize the pacing protocol to induce arrhythmia. The Detect Reentry button works only when a reentrant arrhythmia is ongoing and detects the reentry circuit. It is useful in deciphering the exact mechanism of arrhythmia in scenarios when more than one arrhythmia is possible (for example, both slow-fast and fast-slow variants are inducible in AVNRT scenario).
Help: This panel links to useful help documents, including the current document (User's Manual) and arrhythmia-specific tutorials.
svtsim lite
svtsim uses HTML5 technology for rendering signals. Virtually all modern web browsers (newer versions of Firefox, Chrome, Safari Opera, Internet Explorer version 9+) support HTML5 and are campatible with svtsim. However, older Internet Explorers (version 8 and older) do not support HTML5. svtsim detects such browsers and switches to svtsim lite, which uses Adobe Flash for visualization. The main difference between svtsim and svtsim lite is in the way the Pause button behaves. In svtsim, pressing Pause stops the sweeping signals immediately, whereas in svtsim lite, pause takes effect only when the signals reach the right side of the screen. In addition, the caliper is not available in svtsim lite.